

Air Coil Transformer Design Tool
Dan has been in the HVAC industry for 23 years with experience ranging from installation and service to sales and distribution.
Saving Money on Air Conditioning Is Easy
As much as we all want to stay cool and comfortable during the summer months, we also want to keep from going broke in the process. As if utility and potential repair costs aren't enough, you're likely being told that a spring cleaning is the best medicine for your unit and will only cost you about $150.
While I'm sure you're grateful that the nice gentleman you're working with has brought this to light, spending an additional $150 to kick off the summer isn't likely what you had in mind when you asked him how to save money and keep your unit running efficiently. Of course, if he's standing there, you're likely already out $75 just to be in his presence. Are you feeling the heat yet?
Do A/Cs Really Need Annual Cleaning?
That spring cleaning you're being offered is the best medicine, and while a professional HVAC technician is worth the money in most cases, this is not one of them. With the information in this article, not only will you be able to clean your own air conditioner, but you'll be able to do it for little to no cost and understand why it is important.
In many cases, I believe we put off certain "chores" because we don't understand why they are important and, therefore, we improperly prioritize them. Perhaps understanding more about how air conditioning works will motivate us to keep up on this maintenance and help us recognize why it will pay off.
The 3 Main Components of an Air Conditioning System
The three main components I will cover are:
- Condenser
- Evaporator
- Line set
We will touch on other items, but the functions of these parts are the ones that most do not understand.
That said, if you ever see your "low side" frosting or icing up, you either need to change your filter or call a professional as this will not be something you can fix. Running the A/C in this state can cause major damage to your system. If it ices up, shut off the A/C and run the fan only on your furnace to defrost the coil and lines.
The Line Set, Evaporator, and Condenser Explained
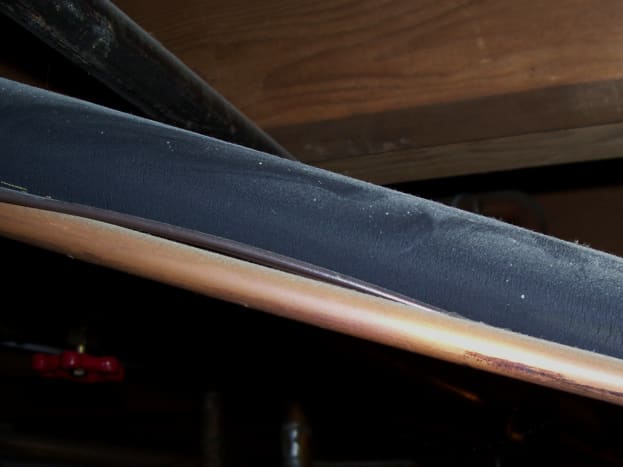
The Line Set: This is the easiest part to describe. These are the 2 copper tubes that carry refrigerant back and forth between the condenser and the evaporator. The larger insulated tube is referred to as the "low side" or suction line. It carries refrigerant in its gaseous state through the evaporator and back to the condenser. The smaller uninsulated tube is referred to as the "high side" or liquid line as it carries refrigerant from the condenser to the evaporator in its liquid state.
The Evaporator: This is the indoor component that is located on the top of your furnace or air handler. As the liquid refrigerant enters the coil, it passes through a metering device of some type. In short, this device controls the amount of refrigerant that enters the coil where the tubing is now increased in diameter. This limitation of refrigerant and increased volume capacity causes a significant drop in pressure. Since pressure and temperature are greatly affected by each other, the drop in pressure causes the boiling point of the refrigerant to drop significantly as well as its temperature. Now the coil, compared to our home, is a cool 65 degrees (approximately) while the boiling point of the refrigerant is somewhere around 55 degrees. This means the liquid refrigerant has boiled off into a nice heat absorbing gas. As the warm air from our home passes over these coils, the heat is absorbed into the refrigerant and sucked back to the condenser. The humidity in this air then collects on the coil like a glass of ice water on a summer day. This condensation then runs down into the drain pan at the bottom of the coil and is discharged by the pipe attached to it.
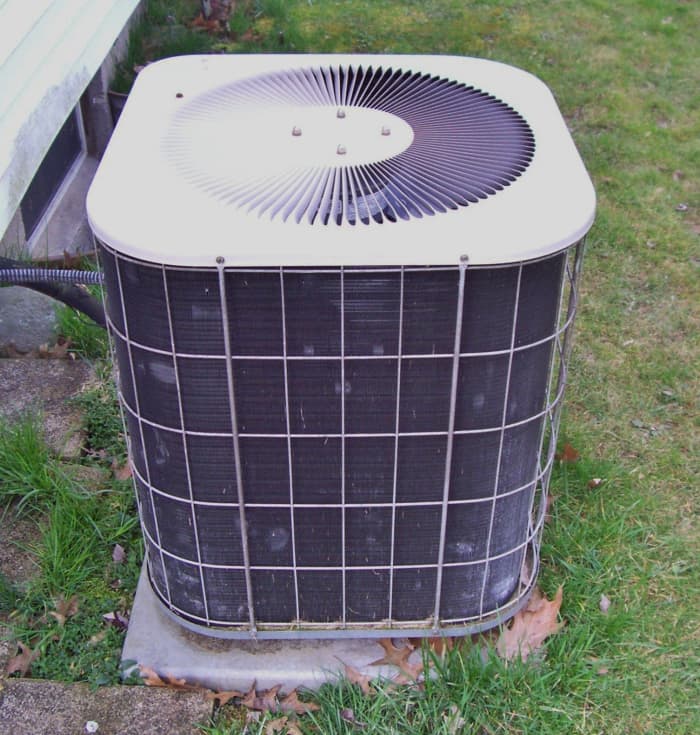
The Condenser: This is the outdoor unit that really powers the whole operation. As the gaseous refrigerant that now contains the heat it has absorbed from the home returns to the condenser, it passes through all those coils you see wrapped in fins and around the compressor. As the fan in the A/C pulls air across the coils, they are cooled. As the coils cool, the gaseous refrigerant begins to return to a more liquid-like state. The compressor then finishes the job by increasing the pressure the refrigerant is under thus increasing its boiling point. This much higher boiling point now means that the refrigerant is turned back into a liquid since it is not nearly hot enough to boil over. This liquid is now pushed back into the skinny copper line and returned to the coil to start the process over again.
Why Is It Important to Clean the Air Conditioning Coils?
Now, there are a few more technical terms, parts, and science to this process we call air conditioning but I feel confident that most of you now know more about how your air conditioner works than you did when you started reading this article. Knowing what you know, how about a little quiz to explain why we need to clean our coils. It's only 4 questions, and I'm pretty sure you'll pass.
Items Used for Cleaning A/C Coils
There are a lot of tools used in HVAC; however, this project will mostly require items you likely have around the house. There are a few things you may want to purchase to do a better job, especially if you're going to continue doing this for yourself in the future.
If you cannot afford to make any purchases, the below steps will still help you to make a difference in the health of your A/C by explaining the tear down of the unit and how to do what you can with what you have.
| Hose | Drill or Hex Driver | Soft Paint or Toothbrush |
|---|---|---|
| Spray Bottle | Coil Cleaner | Zip or Wire Tie |
| Side Cuts | Coil Comb | Non-Absorbant Gloves |
Most things in this list you should be able to find around the house. A coil comb (needed in step 5) and coil cleaner (needed in step 7) are the only exceptions to this. Take a look at each step below for my recommendation on what you should get.
How to Clean Air Conditioning Coils
Step 1: Turn Off the A/C at the Thermostat and Shut Off the Power to the Condensing Unit
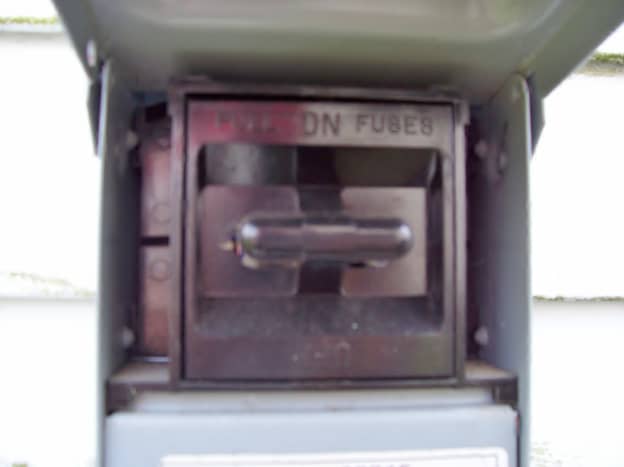
First, you need to turn off the A/C at the thermostat and shut off the power going o the condensing unit. You can do this by opening the disconnect mounted to the house near the unit and removing the stab connection or fuses. Just pull the handle that you see and the terminal should come out. If you do not have a disconnect for some reason, shut down the power at the breaker panel. There should be a dedicated breaker for your A/C.
Read More From Dengarden
- IMPORTANT NOTE: Pulling the disconnect cuts the power to the unit, NOT to the disconnect. Electricity is still being supplied to the disconnect itself. Only the breaker at the panel can cut the power to the disconnect itself.
DO NOT SKIP THIS STEP! Our safety is most important when working on any electrically powered appliance.
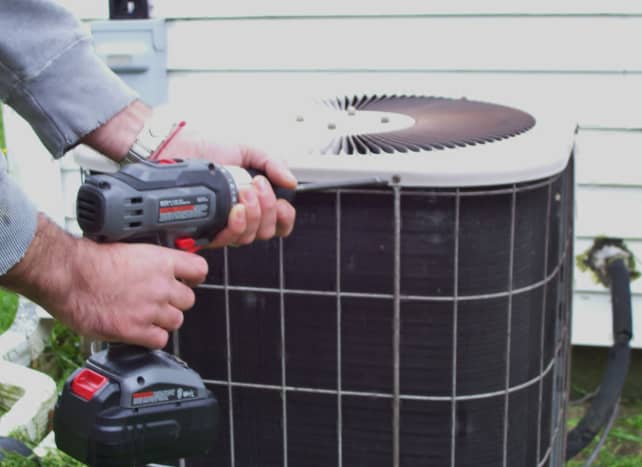
Remove the bolts attaching the top of the unit. A drill will help make this quick work.
Step 2: Remove the Top of the Condenser
With the power off, remove the top of the condenser. Remove the bolts that are attaching the lid to the rest of the condenser but not the bolts that hold the fan to the lid. Leave the fan attached as shown in the pictures. You can use your hex driver or drill to remove these bolts which are usually 1/4", 3/8" or 1/2".
Set the lid with the fan attached aside. Hopefully you have enough slack in the wiring to do so but if not, it is likely because the slack is tied up inside the access panel. If you remove the access cover, you can cut the tie on the wires and should be able to obtain the slack you need. Again, the power is off so there is no worry about shock, just be sure not to cut or nick the wires as you cut the tie. Also be sure the metal on the unit doesn't cut or nick the wires as you maneuver the lid around to a stable resting place. This is a good time to use a paper towel or paint brush to clean out the webs and dirt inside the access panel.
- IMPORTANT NOTE: Pay attention to how the wires are wrapped inside the access panel so that you can tie them back in a similar manner when you're done. Do not disconnect any wires. If you find that you cannot do this without disconnecting wires, contact a professional. Misplacement of wires can cause immediate damage to your unit and present potential safety hazards.

Remove the bolts at the bottom of the cage.
Step 3: Remove the Caging
Now with the top off, we should be able to remove our caging. If you have a metal casing or cabinet around your condenser, the theory here will still be quite the same. Remove the bolts at the base of the unit that are attached to the cage and it will come off rather easily. Again, use care as we don't want to smash down any more of those fins than are already.
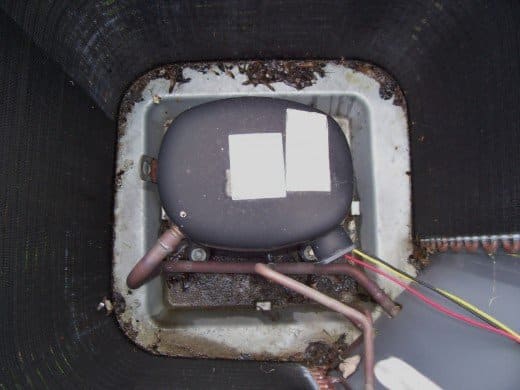
This is the compressor at the base of the unit and the mess we're needing to clean.
Step 4: Clean Out the Debris in the Base of the Unit
Clean out the debris in the base of the unit where the compressor is located. Leaves and other of natures falling gifts get into the top of the unit when it's not running. When they get wet and decay in the unit, they promote corrosion and in the summer form a blanket of insulation under the compressor that decreases the airflow that we need to help cool the compressor.
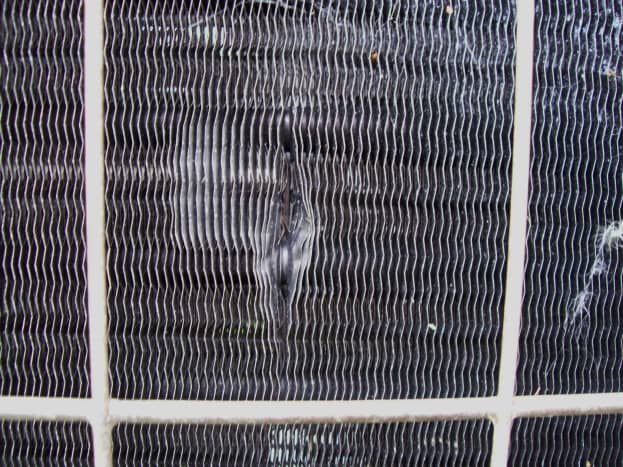


Smashed fins will hurt your efficiency. Areas this bad though may not comb through and should be avoided if they don't.
Step 5: Comb Out the Smashed Fins
We want to open the fins up first so we will be able to clean the space between them. Here's where we need this little air conditioning coil comb. Make sure you're using the side of the comb with the properly spaced teeth or you will cause more damage than good.
Also, do not force the comb through any areas that are resistant. You will tear these very thin pieces of metal. Give the comb a little wiggle as you work through a dented area. Lastly, if you don't have this comb, you could use a butter knife or something similar. The only down side here is that it takes a bit longer.
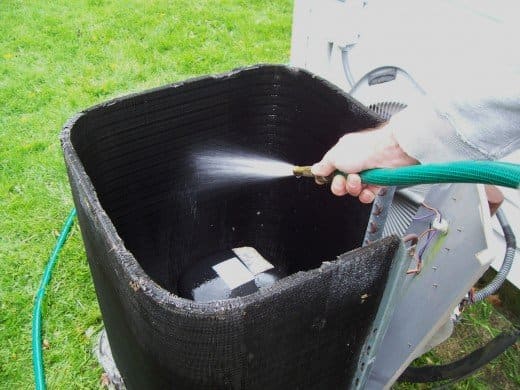
Spray from the inside out.
Step 6: Presoak the Unit
Go ahead, hose that thing down. Spray from the inside out to push back what was trying to be sucked in. You want to avoid spraying directly at the disconnect or the electrical components inside the access panel but a splash here and there isn't going to hurt anything. Other than that, let her have it. It's built to be outside so water isn't going to harm it at all. Pay attention to the outer base of the unit where heavier grass deposits are likely to build up.
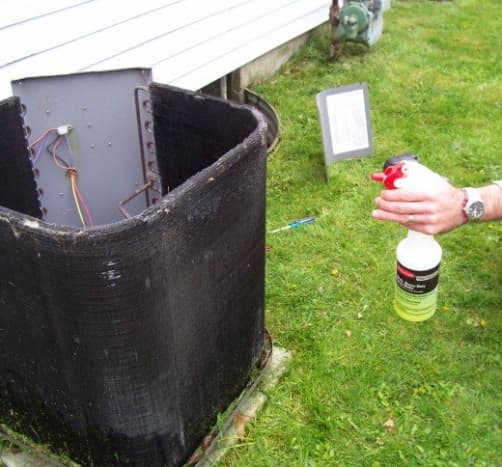


Serve a good helping of cleaner to the coil exterior.
Step 7: Spray the Coils Down With Your Cleaner Mix
Cover the coils front and back, bottom to top with a healthy dose of your coil cleaner. Let the cleaner sit for a bit and then hose it down again. Follow the directions provided by the manufacturer of your coil cleaner for mixing ratios and stand time. These may very a bit based on the product you choose.
I suggest a self cleaning, non-corrosive type of cleaner that is environmentally sound, such as this Nu-Calgon brand coil cleaner. It works well, gets things very clean, and is reasonably priced.
See the grass through the fins? This is what we were aiming for.
That's It!
We're done out here! At this point, just button the unit back up the same way you've taken it apart and you're all set. Make sure your electrical components are dry, plug the disconnect back in and turn on the breaker and thermostat.
Cleaning the Evaporator Coils May Not Be as Easy
Gaining access to the evaporator coil is not nearly as easy as the condenser coils. If you have an access panel to the evaporator, this is great. Here is the main reason I suggest the self cleaning coil cleaners. You can just spray the evaporator with this mix and it will use the condensation created during use to wash away the cleaner.
If you can reach up under the coil, this is even better. If you have pets, you may be able to gently pull out hair that may have gotten in here prior to spraying the coil with your cleaner.
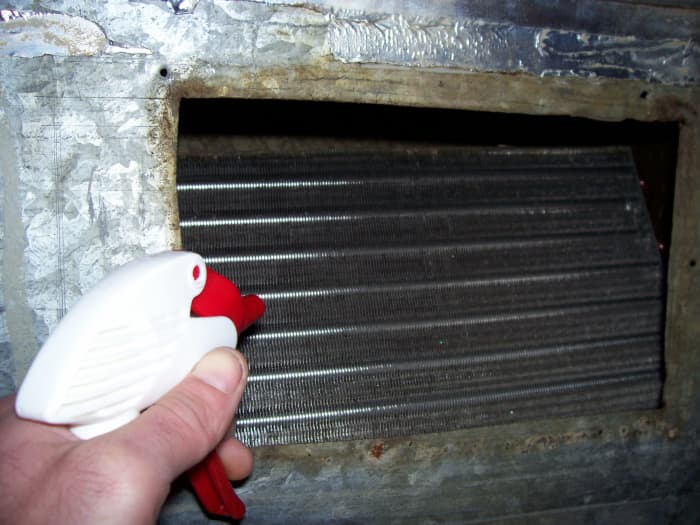
Through this opening, I am able to spray down the coil with a good dose of cleaner and let the unit do the rest.
I only feel right to mention that the evaporator is typically removed to be cleaned thoroughly but that is not something you can do yourself. Not only are there many costly specialty tools involved, this is illegal without the proper licensing and can be very unsafe. Our method here for cleaning the evaporator is a "better than nothing" approach but does make a difference if you can gain access to the coil.
Using a good filter and keeping your air ducts clean will help to keep the evaporator clean as well. Here's a simple to follow guide I wrote to help you this that: How to Clean Air Ventilation Ducts Yourself.
Implement these habits and cleaning your coil won't be needed nearly as often.
Every Little Bit Counts
I know there is a lot here in this article but when it comes to air conditioning, well, there's a lot to cover. Even if you just end up taking the top off the unit and spraying it down with the hose, you'll be making a difference in how long your A/C lasts and how well it runs.
To get even more out of your air conditioner, have a look at the article I wrote all about how to make your air conditioner more efficient. You should be well on your way to saving yourself good money on both repairs and utilities.
As always, if you run into a situation that is not as described in this article or you aren't confident in what you're doing, never make assumptions with these types of appliances. Call a professional.
I hope this was helpful and I appreciate any feedback you may have to offer on these instructions.
Pop Quiz!
For each question, choose the best answer. The answer key is below.
- Can air pass over the coils if they are plugged with dirt, grass and leaves?
- Yes
- No
- Will the compressor run hot and the refrigerant misbehave if there is no airflow?
- Yes
- No
- When electrical components run hot they...
- draw more power, overheat and breakdown.
- This answer is wrong.
- Will our A/C run efficiently if nothing is doing what it is supposed to do?
- Yes
- No
Answer Key
- No
- Yes
- draw more power, overheat and breakdown.
- No
This article is accurate and true to the best of the author's knowledge. Content is for informational or entertainment purposes only and does not substitute for personal counsel or professional advice in business, financial, legal, or technical matters.
Questions & Answers
Question: What cleaning solution did you use to clean your air conditioner coils?
Answer: I personally used NuCalgon and Diversitech Pro Green over time. Check for the environmentally safe types so you don't have to worry about drain off.
© 2012 Dan Reed
Marc on June 09, 2020:
How can you me? My inside and outside unit works but doesn't cool. It not clog_up nor any water dripping from the unit going to outside drain. How can you help with words of advice?
Daniel on August 21, 2019:
hi, My AC is 2 years old, and it just stopped cooling my house. it is running but the temp is not dropping and it s hot inside. i have replaced the furnace filter but it s not cooling. The fan is on Auto mode and it s running all the time. please help
Dorothy Davenport on August 01, 2019:
I bought a used ac unit it worked fine. Then it stopped getting cold. He cleaned the coil, but said i need a new coil which would cost 2000 dollars. Is there anything i can do to get a coil for less than 2000 dollars?
Dan Reed (author) on July 05, 2017:
Peter - That can vary a lot on how your coil is installed but a guess would be around $250 - $300 so long as they don't have to add back any refrigerant. Hope that helps. Also note that if the coil is dirty, it's money well spent and will increase airflow significantly if blocked up. Thanks for reading.
Peter Manfredi Sr. on July 04, 2017:
What does it cost, on average, to have the inside coils cleaned?
Dan Reed (author) on December 23, 2012:
@LocalHero - Yes. That would work. Don't be afraid to soak it fairly well so no residue is left (or as little as possible).
LocalHero on December 17, 2012:
Thanks Cre8tor, I'm in Charleston SC so it's not very cold and usually humid but we're still not running AC here. Somewhere I read of someone who used a foaming type cleaner then rinsed it with a spray bottle of water. Think that might simulate condensation well enough to rinse the indoor unit?
Dan Reed (author) on December 17, 2012:
@Stacyman - I know it's been a ridiculously long time since you wrote and I'm sorry I didn't notice. Yes, it's always better than nothing and I've using the "no rinse" type products before but never on an extremely heavy cleaning. Not for any reason than I haven't been faced with one while using the "no rinse" type. Please let me know how this worked for you and if it was a heavy cleaning. Kudos for taking this on yourself!
Dan Reed (author) on December 17, 2012:
@LocalHero - You could clean them but the self rinsing type cleaners will not work since there is no humidity to remove from the air in your home this time of year. (assuming it's as cold as it is here :-) Spring is probably the better time and if you are in desperate need of a cleaning now, perhaps you can get to any easy to remove pet hair and such and save the cleansing for the spring. Thank you for reading.
LocalHero on December 16, 2012:
Great tutorial! I have a heap pump. Can I clean the evaporator coils in the winter too? If I spray them down will there still be condensation to rinse them off?
Thanks for the useful info!
stacyman on September 10, 2012:
I had an a/c man come out today to try to figure out why my system is freezing up. He says the builders didn't make the air returns big enough and offered to fix that problem for about $800.
I mentioned to him that the unit worked fine for 7 years. So, it may be true that the air return isn't big enough but there must be something else. When I pressed him on this issue he mentioned that the coils may be dirty. He said they could be cleaned for $375 each ( I have a two-story house with two units ).
So, I'm going to do the "better than nothing" approach you mentioned. I'm going to clean the darn things myself, especially considering the fact that he said these units usually last about 10 years and mine is already 7 years old.
Here is my problem. I have an a-frame type coil and the air flow is going up. I do have access to the bottom of the coils but I really won't be able to see what I am doing.
I'm planning on using a foaming no-rinse coil cleaner. I'll just have to stick my hand in and spray and hope to hit it good all over. I think I'll buy at least two cans just to be safe.
How do you like the foaming no-rinse cleaners? They are "better than nothing", aren't they? :)
Dan Reed (author) on August 25, 2012:
@ greeneryday - Thank you very much. What a great compliment and I'm glad it was helpful.
greeneryday from Some tropical country on August 24, 2012:
Very detail and informative hub about cleaning air conditioner's coil, with step by step instructions guided with pictures too, could not find any better than this, voted up for awesome!
Dan Reed (author) on July 01, 2012:
You're welcome bleedercleaners. I'm glad I'm able to help and thank you for your comment.
bleedercleaners on June 30, 2012:
REALLY INFORMATIVE AND USEFUL INFORMATION. THANKS!
Air Coil Transformer Design Tool
Source: https://dengarden.com/appliances/cleaningtheairconditioner
Posted by: swansonmagery.blogspot.com
0 Response to "Air Coil Transformer Design Tool"
Post a Comment